Welcome to our beginner's guide to WordPress! If you're new to WordPress and looking for a step-by-step tutorial to help you get started, you're in the right place. In this guide, we'll walk you through the process of installing your first theme on WordPress. But before we go any further, if you want to practice working with WordPress on localhost, be sure to check out our blog post titled “WordPress for Beginners: Step-by-Step Tutorial”. click here
Understanding Themes in WordPress
When it comes to WordPress, themes play a vital role in the overall design and look of your website. In this section, we will explain what themes are and how they can enhance the visual appeal of your site.
Explore theme options
Before installing a theme, it's important to explore the different options available. We'll guide you through the process of finding and choosing a theme that suits the purpose and style of your website.
Installing a Theme from the WordPress Theme Directory
The WordPress Theme Directory offers a wide range of free themes that you can install with just a few clicks. We'll show you how to find a theme, preview it, and install it directly from the directory.
Step 1: Accessing the WP-Cloud Dashboard
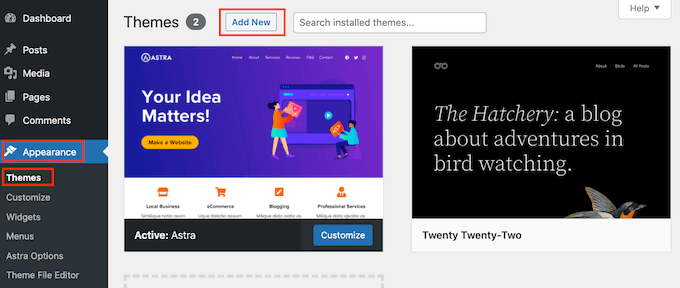
To begin the theme installation process, log in to your WP-Cloud account and go to the dashboard. This is where you can manage and customize your WordPress website.
Step 2: Selecting the "Theme" section
Once you are in the WP-Cloud dashboard, find the “Themes” section and click on it. This will take you to an area where you can manage your website's theme.
Step 3: Choose a new theme
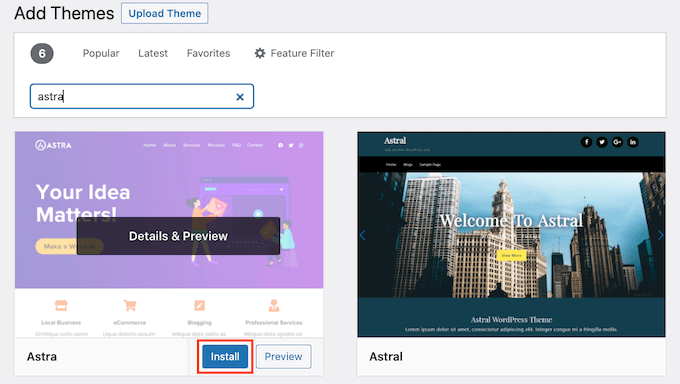
In the "Themes" section, browse the available themes and select the one you want to install. WP-Cloud offers a wide range of themes, including both free and premium options. Consider your website needs and design preferences before choosing any option.
Step 4: Installing and Activating the Theme
After choosing the theme you want, click the "Install" button. WP-Cloud will automatically download and install the theme on your WordPress site. Once the installation is complete, click the “Activate” button to activate the theme on your website.
That’s it! You have successfully installed the WordPress theme from WP-Cloud. You can now further customize the theme to suit your website branding and content.
Installing themes from third-party sources
In addition to the WordPress theme directory, there are many third-party sources that offer premium themes. We'll explain how to install themes from such sources and provide tips to ensure that the theme is safe and reliable.
Customizing your theme
Once you've installed the theme, it's time to make it your own. We'll cover the basics of customizing your theme, including changing colors, fonts, and layout to create a unique and personalized website.
Best Practices for Theme Maintenance and Updates
Regular maintenance and updates are important for the security and performance of your WordPress theme. We'll discuss best practices for keeping your theme up to date and ensuring a smoothly running website.
conclusion:
Congratulations! You have successfully learned how to install your first theme on WordPress. Remember to choose a theme that suits the purpose and style of your website, and don't forget to regularly update and maintain your theme for optimal performance. If you want to explore more WordPress tutorials and get practical experience, be sure to visit our blog post titled.


Comments
Post a Comment